Good-bye old friend....But we were every really friends? Or were we just forced together by circumstances? You were a light fixture and I needed something to illuminate the toys and children at my feet. Thank you for serving our family for 5 years, but I am sorry to inform you though that you have been replaced by a newer, prettier model. I'm sure someone will snatch you up at the Goodwill and put you to work again. For now, please enjoy some rest during this holiday season. You deserve a vacation.
Yes, I did it. I got the crazy itch to install that darn dining room light on my own. Dan was at work, clueless to my wandering mind. Thanks to a quick tutorial on You Tube, I was in business. Black wire to black wire. White wire to white wire and green to green. Easy, right? Well, easy for most. But this being my first venture with electricity, it took me a bit longer than expected. Three hours to be exact!
The light box in my ceiling was smaller than the metal plate needed to hang the light. This meant that the head of the screws ran into the ceiling instead of into the light box. So most of my time was consumed with finding a shorter screw. I was certain I had some that would do the job. So I searched. And searched.
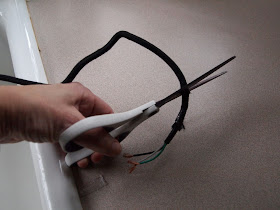
After not having any luck, I decided to switch gears and cut the wires and cord shorter. They gave me plenty of cord....about 2 extra feet to be exact!
And of course, I didn't have the proper tool to cut the wires.
I tried cutting a test piece to see how my scissors would fare. I was so careful. And so unsuccessful. So off to Lowes I went.
I needed shorter screws and a wire stripper. The wire strippers was a quick task. I even had the nice gentleman cut the cord and wires for me. The screws became an issue all of it's own. Turns out the decorative 'nut' would only thread onto the long screw that came with my light fixture! Even though they measured the screw, and the nut, it would not thread onto a new screw. So my only option was to cut the provided screws. I got a new hacksaw blade to just make sure I had the proper tools since I wasn't sure how sharp our blade was at home. Wouldn't want to have to go back to Lowes! The lights were off in our house and it was getting dark. So I needed to get that light installed asap!
Once I got the screws cut (which only took a few minutes, surprisingly!), I was cruising! I carefully connected all of the appropriate wires and ta-da! Let there be light!!
We did put the pretty shade and light diffuser on too. And trust me, it looks great....but you'll have to wait a few more days to see the final product. (Sorry that the light is all askew! It straightened out when I put the shade on).
I need to finish decorating for Christmas. And I'm waiting for a few plate hangers to come in the mail. I ordered these adhesive plate hangers from allplatehangers.com.
So assuming those come this coming week, I'll finish up the room and post the finished product !
Thanks for reading. And I hope you all are having a great start to your holiday season!!
Jen


Are the plate hangers just for Christmas plates? Is that why you chose adhesive?
ReplyDelete